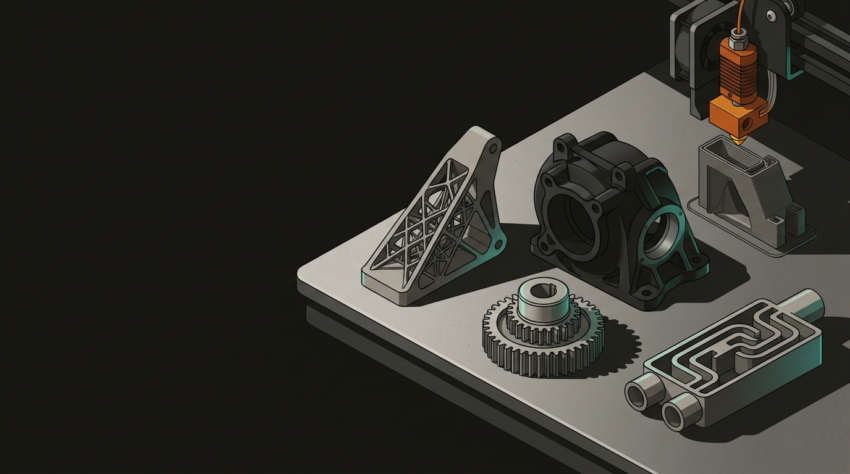

3D Printing for Functional Parts Beyond Prototypes — When Additive Manufacturing Becomes a Production Tool
The question used to be “can we prototype this?” Now it’s increasingly “can we just make the actual part this way?” For a growing range of applications, the honest answer is yes — but only if you know exactly where the limits are.
The word gets thrown around loosely. For practical purposes, a functional part must meet all of the following criteria — not just one or two:
Carries real stress in service — static, dynamic, or impact — not just structural appearance.
Must hold tolerances over its full working life, not just during a fit-check on the bench.
Survives real-world conditions — UV, heat, chemical exposure, vibration, and moisture.
Replaces or substitutes for a conventionally manufactured component in a real assembly.
This is meaningfully different from a display model, a fit-check prototype, or a jig used once. Modern FDM and resin processes — paired with the right materials — genuinely can deliver this. The caveat: not always, not for everything, and not without understanding the constraints.
The default filaments most people learn on — standard PLA, entry-level resins — are not production materials. Here is how to think across the performance spectrum:
Structural Workhorse Materials
- PETG for moderate loads up to ~75°C — tough, unfussy, reliable for brackets and enclosures
- Nylon PA12/PA6 for fatigue resistance and dynamic loading — absorbs moisture, plan for it
- CF-reinforced composites (CF-Nylon, CF-PETG) for high stiffness-to-weight — needs hardened nozzles
High-Performance Speciality Materials
- PEEK retains properties past 250°C — aerospace, medical, chemical processing applications
- PEI (Ultem) for flame resistance and dimensional stability in demanding environments
- ASA for outdoor NZ use — UV-stabilised, weather-resistant, smarter than ABS outdoors
Engineering resins deserve their own mention. Rigid, tough, and ceramic-filled resins from manufacturers such as Formlabs now produce parts with properties that genuinely compete with injection-moulded thermoplastics in select applications — fluid-handling components, electrical housings, and high-detail structural parts. Limits remain: part size, and sensitivity to prolonged UV exposure without proper post-cure.
Additive manufacturing is not cheaper than injection moulding at scale. That is not debatable. But there are five specific scenarios where it consistently wins on total cost:
Low to medium volumes — 1 to ~500 parts
Injection mould tooling runs $5,000–$80,000+ NZD depending on complexity. Below a few hundred units, 3D printing typically wins on total cost, particularly for complex geometries that would require multi-part moulds.
High geometric complexity
Internal channels, lattice structures, consolidated assemblies, awkward undercuts — you are not just competing on unit cost. You are eliminating tooling complexity entirely. That changes the calculation.
Active design iteration
If a part might change in six months, locking in an injection mould is a significant gamble. Printing keeps the design agile at a fraction of the capital commitment.
Spare parts and obsolete components
Underutilised in NZ manufacturing. When a critical machine part fails and the OEM no longer supplies it, additive manufacturing can produce a functional replacement from a CAD file — sometimes within 24–48 hours. For industries running ageing equipment, that is a lifeline.
Short-run production tooling and customisation
Jigs, fixtures, end-of-arm tooling for robots, custom mounting hardware specific to one production line — high-value, low-volume items where 3D printing consistently beats traditional manufacturing on both cost and lead time.
The sectors pushing hardest on functional additive manufacturing are not doing it for novelty. They are solving real production problems that conventional processes handle poorly:
GE Aviation prints LEAP engine fuel nozzles — consolidating 20 components into one, with internal cooling geometry impossible to machine.
CF-reinforced aero components, cooling ducts, and interior panels where weight saving justifies unit cost over injection moulding.
Surgical guides, dental models, and custom prosthetics — patient-specific geometry makes conventional tooling impractical by definition.
Replacement guards, brackets, sensor mounts, and housing parts for machinery where imported components carry weeks-long lead times.
FDM parts are inherently anisotropic — properties vary by print orientation. A part printed vertically will typically be significantly weaker in the Z-axis (layer separation) than in X and Y. That is not a flaw; it is a design constraint. Understand it and design around it:
Orientation Strategy
- Orient so primary load paths run with the layers, not across them
- Align layer boundaries away from tensile failure zones
- Simulate expected loading before committing to print direction
Wall Count & Infill
- 3–5 perimeter walls for anything structural (not the default 2)
- Beyond 40% infill, returns diminish for most geometries
- Rectilinear or gyroid infill over grid for load-bearing applications
Post-Processing
- Anneal nylon parts — improves mechanical properties and dimensional stability reliably
- Vapour smoothing for improved fatigue life on ABS and ASA
- Sand and seal resin parts that face prolonged UV exposure
Verification
- Do not rely solely on material datasheet values for critical applications
- Third-party mechanical testing of printed samples before production sign-off
- Behaviour of printed parts and test specimens can diverge — always confirm
The question is not whether 3D printing can produce functional parts — it clearly can, across a wide range of applications. The real question is whether it is the right process for your specific part, volume, material requirement, and budget.
Choose Additive When…
- Volume is under ~500 units and tooling cost is prohibitive
- Geometry has internal features, lattices, or consolidated assemblies
- Design is still evolving and locking tooling is premature
- A spare part is urgent and the OEM can no longer supply it
- Customisation varies unit-to-unit (patient-specific, site-specific)
Stick with Conventional When…
- Volume exceeds 500–1,000 units and geometry is simple enough to mould
- Part requires isotropic mechanical properties throughout
- Surface finish or dimensional tolerance cannot be met post-process
- Material is not available in a printable form with required properties
- Regulatory certification requires established manufacturing evidence
Often the right answer is a hybrid approach — print functional parts and early-run components while mould tooling is being cut, then transition to injection moulding at volume. The decision is rarely binary; it is a question of which process owns which phase of the product lifecycle.
Working through a decision on a replacement part, a custom production component, or a design someone’s told you “can’t be printed”? At Plastixel — GeoSaffer’s dedicated 3D printing operation — we work across both additive and conventional manufacturing and will give you a straight answer on which process makes sense for your specific application.
Explore production printing at Plastixel →