
Prototype to Production Manufacturing considerations for NZ hardware startups
Going from one working prototype to one thousand consistent units is not a quantity problem — it is a different kind of engineering challenge entirely. The decisions made in the months between validation and volume production shape whether a product launches profitably or grinds through endless rework and supplier disputes.
A prototype is built to demonstrate. Production requires something that can be consistently replicated — by machines, by workers who have never seen the design, at speed, at cost. Those are two genuinely different problems.
The common failure mode: a founder builds a working prototype with tolerances fudged where needed because it only had to work once. It goes to a manufacturer and nothing fits together properly. Per-unit cost is triple the estimate. Lead times blow out. Design for manufacturability (DFM) is what bridges the gap.
Prototype Mindset
- Does this part demonstrate the design concept?
- Tolerances fudged where needed — it only runs once
- Hand-assembled with care and iteration
- Built to impress investors and validate assumptions
Production Mindset
- Will every part in this batch meet specification?
- Can we prove it with documented QC processes?
- Replicated consistently at cost and at speed
- Built to scale without tribal knowledge
DFM is not about watering down a design. It is about making sure the design can be made efficiently in the first place. The earlier these principles are applied, the less painful — and less expensive — the path to market becomes.
Use materials and components available in standard sizes and grades wherever possible. Custom extrusions, non-standard fasteners, and exotic alloys all inflate lead times and costs. In New Zealand, where geography adds friction to supply chains, this matters more than it might elsewhere.
Every part carries a cost — materials, assembly time, QC, inventory. Can that bracket and housing be one injection-moulded piece instead of two? Can the cable assembly be simplified? The best component is usually the one you do not need.
A part that is straightforward to 3D print might be difficult or expensive to injection mould. A design that assembles beautifully by hand might be nearly impossible to replicate on a production line. You need to know how you are going to manufacture before the design is locked in.
Injection mould tooling is often the single largest capital outlay in early production. Aluminium prototype moulds run $3,000–$10,000 NZD. Production-grade steel tooling can reach $30,000–$100,000 or more. There is a better path before committing to that spend.
Bridge production — using 3D printing, CNC machining, or vacuum casting to produce small batches — lets you generate revenue and real-world feedback before the design is locked in and before a major capital commitment is made.
3D printing and CNC machining. Fast iteration, no tooling commitment, ideal for beta testing and investor demos.
3D printing, vacuum casting, short-run CNC. Bridge production that generates revenue before design lock-in.
Low-volume injection moulding and CNC. Tooling investment justified by validated volume and stable design.
Full injection moulding and die casting. Unit economics justify the tooling cost at this scale.
Material requirements, complexity, and geometry all affect the real crossover point — but this is a sensible starting framework. Most NZ hardware startups underestimate how long they should stay in bridge production before committing to tooling.
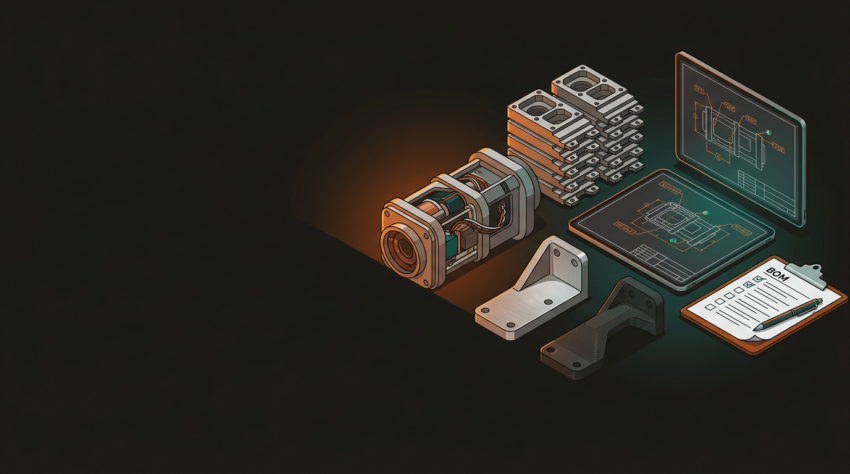
QC is not a final inspection step. By the time a defect shows up in a finished product, the labour, materials, and time to produce it have already been spent. Effective quality control is built into the process from the beginning.
Documentation Required
- 2D engineering drawings with GD&T callouts
- Complete BOM with supplier part numbers
- Assembly instructions without tribal knowledge
- Acceptance criteria — what a passing part looks like
Process Controls
- First article inspection before running a full batch
- Identify which tolerances are genuinely critical
- Define sampling protocols for ongoing production
- Document defect categories and disposition process
A surprising number of startups enter production without complete technical drawings or a bill of materials. That is a reliable path to inconsistency, supplier disputes, and expensive rework. Sort the documentation before placing the production order.
New Zealand’s small market creates real challenges and some underrated advantages for hardware startups. Local suppliers often cannot match offshore unit pricing — that is just true. But working locally buys responsiveness, clear communication, and quality oversight that offshore production genuinely struggles to provide at lower volumes.
Source Locally For
- Custom fabricated parts and short-run production
- Prototyping and DFM review conversations
- Parts where design changes are still likely
- Anything with a tight feedback loop requirement
Source Offshore For
- Commodity electronics and standard fasteners
- High-quantity, stable, well-proven designs
- Standard plastics and common sheet materials
- Parts where minimum orders and lead times are predictable
Build the relationship with a local manufacturing partner before you actually need volume. When the time comes to scale quickly, you want someone who already knows your product — not someone reading your drawings for the first time under pressure.
GeoSaffer works across laser cutting, CNC, 3D printing, and custom manufacturing in Auckland. If you are at the prototype-to-production stage and want a practical conversation about your options — bridge production, DFM review, process selection — bring your product and we will give you a straight answer.
Start the conversation →